How to export media
The Export tool enables authorized users to export media files from the current![]() The record currently displayed in Record details View or highlighted (with a solid background) in Result set View or Gallery View for instance. record, one or more marked
The record currently displayed in Record details View or highlighted (with a solid background) in Result set View or Gallery View for instance. record, one or more marked![]() Marking a record means selecting it by adding a tick to the record's checkbox in Result set View or Gallery View, and in Record Details View from Collections 1.15 onwards. One or more records can be marked and then actioned in some way (e.g. printed). records, or all records currently listed in Result set View. Media files are exported to a single zip file.
Marking a record means selecting it by adding a tick to the record's checkbox in Result set View or Gallery View, and in Record Details View from Collections 1.15 onwards. One or more records can be marked and then actioned in some way (e.g. printed). records, or all records currently listed in Result set View. Media files are exported to a single zip file.
To export media from a subset of records listed in Result set View, mark![]() Marking a record means selecting it by adding a tick to the record's checkbox in Result set View or Gallery View, and in Record Details View from Collections 1.15 onwards. One or more records can be marked and then actioned in some way (e.g. printed). the records before accessing the Export box, otherwise just:
Marking a record means selecting it by adding a tick to the record's checkbox in Result set View or Gallery View, and in Record Details View from Collections 1.15 onwards. One or more records can be marked and then actioned in some way (e.g. printed). the records before accessing the Export box, otherwise just:
- Select the Export
 button in the Result set View toolbar to display the Export box.
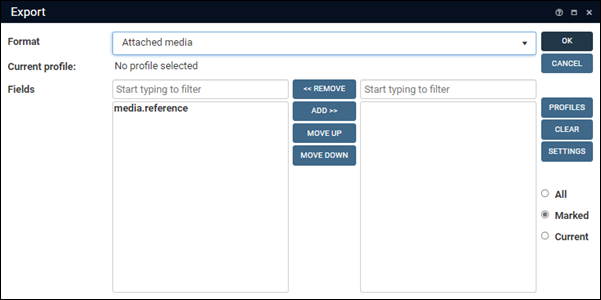
 - Select Attached media from the Format drop list:

- The column on the left lists an image fields in the current data source
 The management of a collection can involve a vast amount of information about objects / items / books, people and organizations, events, administration and more. This information is stored as records in data sources. Each data source stores a specific type of information: details about collection items, people, events, loans, and so on. (usually only one). Media saved to this field will be exported.
Tip: It is not necessary to move the desired media field(s) to the column on the right (unlike other types of export).
- Indicate whether you want to export media files from the current
 The record currently displayed in Record details View or highlighted (with a solid background) in Result set View or Gallery View for instance. record, marked
 Marking a record means selecting it by adding a tick to the record's checkbox in Result set View or Gallery View, and in Record Details View from Collections 1.15 onwards. One or more records can be marked and then actioned in some way (e.g. printed). records, or all records currently listed in Result set View:
- If you did not mark
 Marking a record means selecting it by adding a tick to the record's checkbox in Result set View or Gallery View, and in Record Details View from Collections 1.15 onwards. One or more records can be marked and then actioned in some way (e.g. printed). any records before accessing the Export box, the Current radio button will be selected: you can select All.
 - If you did mark records, the Marked radio button will be selected: you can select Current or All.
- If you did not mark
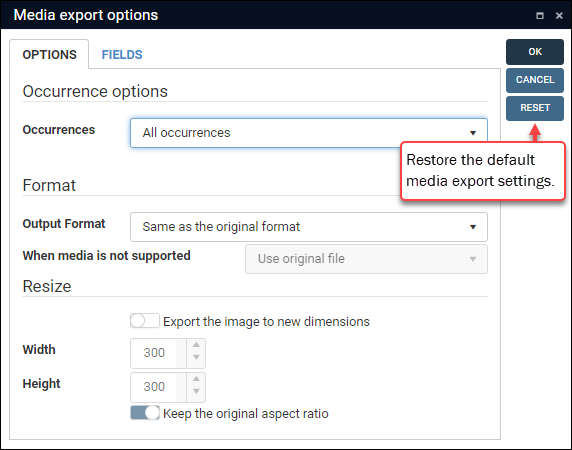
- (Optional) A default set of media export settings has been defined; if necessary, you can review and change these in the Media export options box by selecting Settings:
 Media export options
Note: Any changes you make only apply to the current data source; they are associated with your user account and recalled by Collections whenever you log in.
Setting
Details
Occurrences
Select an option in the Occurrences drop list to specify which occurrence(s) are exported:
All occurrences
Export all media files linked to a record.
First occurrence
Only export the first linked media file.
Preferred
Only export the media file that has been marked as preferred (details here).
Output format
Specify what format images are exported in.
Note: All other types of media are exported in their original format.
Files can be exported in the same format they are stored in Collections by selecting Same as the original format, or they can be exported in one of the following formats:
- gif
- jpeg
- png
- tiff
Selecting one of these formats may entail converting images from one format to another.
Note: This only affects the exported file; the image file in Collections remains unchanged.
If an image file is in a format that cannot be converted to your selected format, you can specify what happens by selecting an option from the When media is not supported drop list:
- Use original file
- Skip
The image will not be exported (any others will be).
- Stop export
Cancel the export (no images will be exported).
Resize
Tip: Leave the Export the image to new dimensions option deselected to export images in their original dimensions.
This setting only affects image files.
To resize exported images:
Enable the Export the image to new dimensions option.
Specify a target Width and/or Height.
The Keep the original aspect ratio option is enabled by default and should remain enabled in order to preserve the aspect ratio of a resized image: when resizing the image, Collections will ensure that the aspect ratio is preserved (a target width / height might not be achieved if it would affect the aspect ratio).
If you deselect the Keep the original aspect ratio option, images will be resized to the target width / height even if that changes the aspect ratio.
 Reset: restore defaults
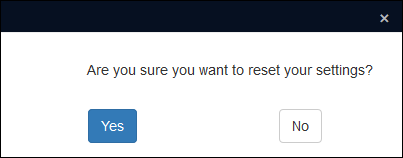
You can return the Media export options box to its default state by clicking the Reset button1. A message will ask you to confirm the reset:

Tip: An option in the Main menu enables you to restore ALL settings you have changed across Collections back to their default. The Reset option in the CSV settings box only affects this box's settings.
When you have made your changes, select OK to save your settings and close the Media export options box.
-
Click OK to start the export.
The progress of the export will display:

When completed, a media.zip file containing all exported media files will have been created in your downloads folder.


