Export
Details about how to configure Export formats can be found in the Axiell Designer Help.
A default set of columns is listed for export in the Export box (see screenshot below). Until a user adds / removes columns from this list, it is the same set of columns configured for Result set View in the current data source. These columns are specified in a screen definition file called something similar to Brief display objects (br_object.fmt) or Brief display Archives (br_archv.fmt).
Custom XSLT formats
From Collections version 1.20 onwards custom XSLT formats can be used when exporting data to transform Collections' native (unstructured or grouped) record XML to another format (e.g. HTML). Details about configuring this functionality can be found in the Axiell Designer Help.
Fields in which values are selected from a drop list are called enumerative fields in Collections. Values in these fields are read-only; they are added and, in a multilingual system, translated by your Application Administrator in the Collections administration tool, Axiell Designer![]() A tool for designing, creating, customizing and managing Axiell Collections applications and databases, broadly speaking, the Axiell Collections Model Application. As well as managing databases, including user access and permissions, Designer is used for such tasks as translating field labels, tooltips, values in drop lists, etc.. The value that you see in an enumerative field in the User Interface is a display value associated with the current interface language, but the actual value stored in the database is a language-independent neutral value.
A tool for designing, creating, customizing and managing Axiell Collections applications and databases, broadly speaking, the Axiell Collections Model Application. As well as managing databases, including user access and permissions, Designer is used for such tasks as translating field labels, tooltips, values in drop lists, etc.. The value that you see in an enumerative field in the User Interface is a display value associated with the current interface language, but the actual value stored in the database is a language-independent neutral value.
In versions of Collections prior to version 1.11, the neutral value is exported with the Export to Excel and Export > CSV functions; from Collections version 1.11 onwards the value in the current interface language is exported.
When importing values into enumerative fields, it is always necessary to use the value stored in the database rather than the value that displays in the User Interface: if you have exported values in enumerative fields using the Export to Excel and Export > CSV functions, the export file cannot be used to import data into enumerative fields unless the interface value is replaced with the value actually stored in the database (details here).
Tip: The Export to Excel option available in the Result set View toolbar provides an alternative (though more basic) mechanism to export selected records to an Excel spreadsheet. Details here.
The Export tool enables authorized users to export data from the current![]() The record currently displayed in Record details View or highlighted (with a solid background) in Result set View or Gallery View for instance. record, one or more marked
The record currently displayed in Record details View or highlighted (with a solid background) in Result set View or Gallery View for instance. record, one or more marked![]() Marking a record means selecting it by adding a tick to the record's checkbox in Result set View or Gallery View, and in Record Details View from Collections 1.15 onwards. One or more records can be marked and then actioned in some way (e.g. printed). records, or all records currently listed in Result set View.
Marking a record means selecting it by adding a tick to the record's checkbox in Result set View or Gallery View, and in Record Details View from Collections 1.15 onwards. One or more records can be marked and then actioned in some way (e.g. printed). records, or all records currently listed in Result set View.
It is also possible to use the tool to export media files attached to one or more records to a zip file1. Exported images can be converted to another format and resized. Details here.
Exporting data
Although data can be exported in a number of formats, the principal export format is CSV:
A CSV (Comma Separated Values) file is a plain text file (it only holds alphanumeric data) with a .csv extension. Data is structured as a table:
- When exported from Collections, the first line / row contains field names as column headers, separated by a comma (or semi-colon).
- Each subsequent rows holds data from a single record, and values from each exported field are also separated by a comma (or semi-colon).
In this example, five fields (named in the first row) are exported:
object_number,title,description_level,dating.date.start,creator
AK/OW/0201,Annual reports energy management,FILE,2001,St Johan District Board of Works
AK/OW/0202,Annual reports energy management,FILE,2002,St Johan District Board of Works
AK/OW/0203,Annual reports energy management,FILE,2003,St Johan District Board of Works
It is common to view and manipulate CSV files in MS Excel (see Field separator below for details about how Excel reads a CSV file). While the Export tool provides a lot of flexibility in defining what and how your data is exported as CSV, keep in mind that there is an Export to Excel option in the Result set View toolbar that greatly simplifies the export of marked![]() Marking a record means selecting it by adding a tick to the record's checkbox in Result set View or Gallery View, and in Record Details View from Collections 1.15 onwards. One or more records can be marked and then actioned in some way (e.g. printed). records to an Excel spreadsheet.
Marking a record means selecting it by adding a tick to the record's checkbox in Result set View or Gallery View, and in Record Details View from Collections 1.15 onwards. One or more records can be marked and then actioned in some way (e.g. printed). records to an Excel spreadsheet.
To export data from a subset of records listed in Result set View, mark![]() Marking a record means selecting it by adding a tick to the record's checkbox in Result set View or Gallery View, and in Record Details View from Collections 1.15 onwards. One or more records can be marked and then actioned in some way (e.g. printed). the records before accessing the Export box, otherwise just:
Marking a record means selecting it by adding a tick to the record's checkbox in Result set View or Gallery View, and in Record Details View from Collections 1.15 onwards. One or more records can be marked and then actioned in some way (e.g. printed). the records before accessing the Export box, otherwise just:
- Select the Export
 button in the Result set View toolbar to display the Export box:
The column on the left lists the system name of all fields you can export.
The column on the right lists the fields that will be exported. The Export box recalls the last fields you exported; if Current profile names an Export profile (Object and media in the example above), the fields in the right column are determined by that Export profile (details below)2. We can keep these fields, remove any of them and add to them.
- Indicate whether you want to export data from the current
 The record currently displayed in Record details View or highlighted (with a solid background) in Result set View or Gallery View for instance. record, marked Marking a record means selecting it by adding a tick to the record's checkbox in Result set View or Gallery View, and in Record Details View from Collections 1.15 onwards. One or more records can be marked and then actioned in some way (e.g. printed). records, or all records currently listed in Result set View:
- If you did not mark Marking a record means selecting it by adding a tick to the record's checkbox in Result set View or Gallery View, and in Record Details View from Collections 1.15 onwards. One or more records can be marked and then actioned in some way (e.g. printed). any records before accessing the Export box, the Current radio button will be selected: you can select All.
Note: Do not select the Marked radio button as the export will fail.
- If you did mark records, the Marked radio button will be selected: you can select Current or All.
- If you did not mark
- Current profile will display the name of an Export profile if you used one the last time you ran an export, otherwise it will show No profile selected.
Note: Export profiles are available in Collections version 1.16 onwards. If Current profile does not appear on the Export box, skip to step 4.
To export data using the current Export profile (called Object and media in the example above), go to step 7.
To select an Export profile, click Profiles.
Profile: view / edit / select an Export profileThe choices you make when configuring an Export job (the export format, selection of fields, etc.) can be saved as a profile (details below at step 6) and re-used as required.
To select an existing Export profile:
Click Profiles to display the Profiles box:
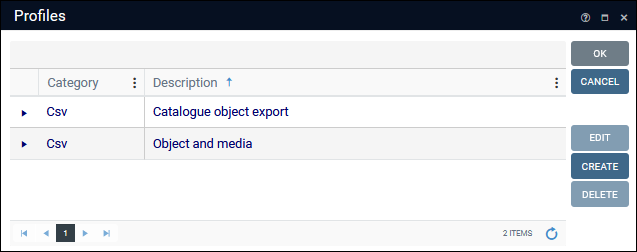
Select an Export profile and click OK and proceed to step 7.
Other options:
Option
Details
Edit
Select a profile in the Profiles box and click Edit to change options and the fields to be exported:

When your changes are made, click OK to save them or Cancel to close the box without saving any changes.
Delete
Select a profile in the Profiles box and click Delete to remove it.
- If you do not want to export data using the current Export profile, click Clear.
This will clear the profile and remove any fields listed in the right column.
Tip: Alternatively, you could modify the current export settings. In this case, do not click Clear but instead proceed to step 4.
- Select an export format from the Format drop list:
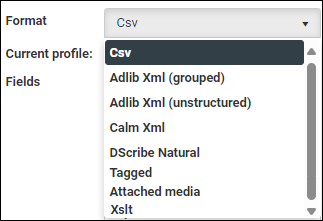
Options include:
Format
Details
Csv
This is the most common export format. Details below.
Adlib Xml (grouped)
Adlib Xml (unstructured)
Calm Xml
DScribe Natural
Tagged
The Format drop list includes a number of export formats intended for organizations that have implemented Axiell Collections on top of an existing Calm or Adlib collections management system. These export formats should not be used unless you have the appropriate legacy system running in your organization.
Export formats available for Calm and AdlibExport format
Details
Adlib Xml
Grouped or unstructured.
Calm XML
DScribe Natural
An export format suitable for Collections for Calm systems.
Tagged3
Corresponds to the Adlib for Windows Tagged file format.
Although CSV and XML are the recommended formats for the exchange of data, the Tagged format is available to assist Adlib for Windows users migrate to Collections where the Adlib Tagged file format has been used extensively. Those familiar with the Adlib Tagged file format will find that most Tagged functionality is the same, although some options are omitted as they are not relevant.
DetailsA Tagged format file has a
.datextension. The Tagged format consists of a list of field tags and values, one per line; a tag and its value are separated by a space. Records are separated by two asterisks. The following example is an export of two book records with a repeated field:%04 29
ti Great Zulu commanders
ex 70
ex 71
au Knight, Ian
**
%0 718
ti The very sleepy pig
ex 1823
ex 1824
ex 1825
ex 1826
au Malam, John
**
Note the following when importing / exporting the Tagged format:
Field type
Details
If a field is repeated, the tag is listed for each occurrence
If a field in the current record can have more than one value, we add an occurrence of the field for each value (e.g. a book can have multiple authors so we add an occurrence of the author.name (au) field for each author). An occurrence can be a member of a group of fields, and adding an occurrence of the field adds all members of the group at once. of the field; empty occurrences will also be exported.Only the resolved (visible) value in a Linked field is exported; for example, a creator's name in Linked field creator (VV) in an object record is exported. Link reference tags (
lrefs) and their values (the record number of the linked record) are not exported even if included in the list of export fields. This might be a problem when importing a non-unique value into a Linked field as the import will locate the first matching value in the index and link to it. This was no different in Adlib so that functionality remains the same. However it is best to avoid importing non-unique values into Linked fields.Tagged format is not recommended for the export of multilingual data as only the value in the current data language is exported without language attributes (and occurrences that do not have a value in the current data language but do have values in other data languages will be exported as empty occurrences).
When importing a value from a Tagged file into a multilingual field in Collections, the value is given the current data language attribute.
Tip: The recommended format for the exchange of multilingual data is XML as it allows for the export of all translations and associated language attributes.
GeoLocation fields can be exported and imported as place names. GeoJSON fields can be exported but cannot be imported. These two field types are not Adlib compatible.
RTF (Rich Text Format) fields
RTF fields exported from Adlib to ADLIB Tagged file format export all RTF codes along with the field contents. As there are no RTF fields in Collections, RTF codes will be imported as field content.
Note: Unlike Adlib, it is not possible to save export settings in a parameter file or profile for re-use.
Attached media
Authorized users can export media files from the current
The record currently displayed in Record details View or highlighted (with a solid background) in Result set View or Gallery View for instance. record, one or more marked Marking a record means selecting it by adding a tick to the record's checkbox in Result set View or Gallery View, and in Record Details View from Collections 1.15 onwards. One or more records can be marked and then actioned in some way (e.g. printed). records, or all records currently listed in Result set View. Media files are exported to a single zip file.Details here.
Xslt5
When custom XLST export formats have been configured for your system, select this option to transform Collections' native (unstructured or grouped) record XML to another format (e.g. HTML) when exporting the data.
DetailsWhen Xslt is selected, a Style Sheet drop list displays to the right. Select the required export format style sheet:

Tip: An XSLT style sheet is provided for export of object data to EODEM
Exhibition Object Data Exchange Model exchange files are designed to simplify and streamline the process of sharing information about exhibition and loan objects between different museum collections management systems. exchange files. The registration of third-party objects for loans and exhibitions is greatly simplified when participating parties support the generation and import of data via the EODEM.When the export is run, your record data is output (as an XML or HTML page for instance) and saved to your Downloads folder.
Tip: Application Administrators will find details about configuring this functionality in the Axiell Designer Help.
When you select Csv, the Settings button is enabled. A default set of CSV export settings has been defined, and you can review and change these if necessary by selecting Settings.
Note: Changes you make apply to the current data source, are associated with your user account and recalled by Collections whenever you log in.
CSV Settings Options tab
Setting
Details
Select a comma (by default) or semi-colon to separate values from each field when exported to the CSV file.
If the value in a field contains commas or semi-colons as punctuation, the value is automatically enclosed with double quotes to distinguish between field separators and punctuation. For example:

Viewing a CSV file in MS Excel
It is common to view and manipulate CSV files in MS Excel. When a CSV file is opened in Excel, the data is converted into a tabular structure: the first row holds field names as column headers, followed by a row for each record in the export file. Values in each row are distributed into columns based on the position of the field separator.
Although Excel supports both field separators, you may find that one or the other does not display your exported data correctly. This may require testing as the effect differs per Windows installation. For example, this CSV file uses commas to separate values and displays correctly when opened in Excel:

This CSV file uses semi-colons and fields do not display in columns correctly:

Note: While the Export tool provides a lot of flexibility in defining what and how your data is exported as CSV, keep in mind that there is an Export to Excel option in the Result set View toolbar that greatly simplifies the export of marked
Marking a record means selecting it by adding a tick to the record's checkbox in Result set View or Gallery View, and in Record Details View from Collections 1.15 onwards. One or more records can be marked and then actioned in some way (e.g. printed). records to an Excel spreadsheet.Select either:
- First occurrence
Only the first occurrence
If a field in the current record can have more than one value, we add an occurrence of the field for each value (e.g. a book can have multiple authors so we add an occurrence of the author.name (au) field for each author). An occurrence can be a member of a group of fields, and adding an occurrence of the field adds all members of the group at once. of a field will be exported (if a book has two authors, only the first will be exported).-OR-
- Merge occurrences
All occurrences will be concatenated and exported.
Use in conjunction with the Occurrence separator text option to separate the concatenated values. For example:
Viewed in Excel, the record for an object with two creators (two occurrences of creator (VV)) will export as:

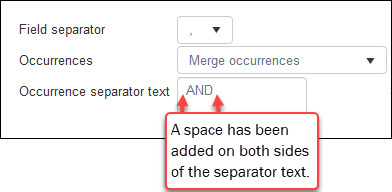
Specify how occurrences will be separated from each other when Merge occurrences is selected from the Occurrences drop list:
- Specify a symbol or text that is unlikely to appear in the data (see Separators in field below).
- Depending on the separator text, you may want to include spaces on either side of it, otherwise the concatenated values and separator will export as continuous text, e.g. GerardANDAnselm.
Note
Empty occurrences will also be exported and the separator will display. In this case, there are three occurrences, but the third has no value:

Specify what to do if the occurrence separator you entered in Occurrence separator text appears in an occurrence of a field in your exported data:

Option
Details
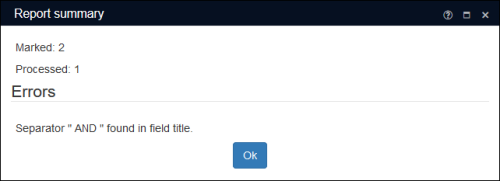
This is the recommended setting.
If the separator text (AND in this bupa
example) is found in your export data, generate an error message and do not proceed with the export:
If the separator text is found in your export data, proceed with the export.
The risk is that it may be difficult to identify whether the separator text (AND in this example) is exported data or separating field occurrences. To demonstrate, we have two occurrences of title (TI) formatted as:

If this is exported with a separator text of AND, it will export as:

If the separator text is found in your export data, remove it from the exported data (not the records themselves) and proceed with the export.
Depending on the separator text you use, you may have to experiment with this. In this example our separator text is AND (with spaces on either side). If we strip this string from the data, the data from our previous example will export as:

Specify whether data in numerical fields (fields with a type of Numeric) with a decimal part are exported with a comma or period as the decimal separator:
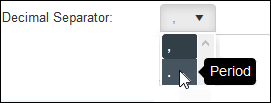
e.g.
100.2or100,2.Note
If you select comma as the decimal separator, and the Field separator (see above) is also a comma, any exported decimal values will be enclosed with double quotes to distinguish between field separators and decimal separators:

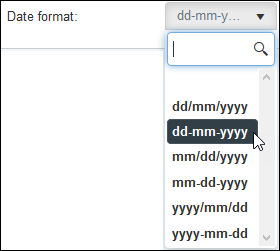
Specify the format in which dates (fields with a type of Date) are exported:
 Fields tab
In Step 5 we add fields to be exported to the right column of the Export box. When you add fields to the right column, Collections recalls them next time you access the Export box; these fields are now effectively default export fields until you manually add or remove fields or click Reset. The Fields tab also lists the fields you have added to the right column of the Export box; if you add / remove fields on the Fields tab, the right column of the Export box will update with your changes (and vice versa).
Reset: restore defaultsYou can return the CSV settings box to its default state by clicking the Reset button6. A message will ask you to confirm the reset:

Tip: An option in the Main menu enables you to restore ALL settings you have changed across Collections back to their default. The Reset option in the CSV settings box only affects this box's settings.
When you have made your changes, select OK to save your settings and close the Media export options box.
- First occurrence
- Add / remove fields to export:
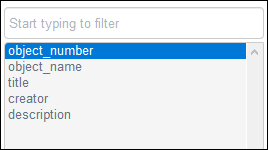
In the list of system field names on the left:
- Scroll through the list
-OR-
- Start typing a name in the text field above the list to filter the list to matching names.
Tip: See Field level help: Help View, Field properties and Tooltip for details about how to identify a field's system name.
- Scroll through the list
- Select a field in the list and click Add to move it to the right hand column (or double-click the field name):

Notes:
- To select multiple fields individually, press the CTRL key as you click field names. To select a number of consecutive fields, press and hold the SHIFT key as you click a field and then click another field higher or lower in the list (all fields from the first clicked field to the second will be selected).
- To include record numbers in the exported data, be sure to include the priref A record's unique identifier (aka Record number). The Record number field is found on the Management details (or Notes and description) panel in Collections version 5.0 onwards. Alternatively, add the priref column to Result set View. The field tag for the priref field is %0. field.
I cannot locate a field I want to export in the Export boxIf a field is not listed by its system name in the left column of the Export box, it may be that a Screen text label has been specified for the field and the field is listed using this Screen text label.
An example of this is the label.text (AB) field in the Object catalogue:

Filtering the list of system fields reveals that this field is not listed by its system name in the Export box:

Screen text labels are specified in Axiell Designer
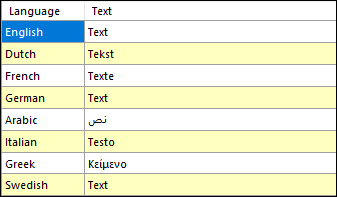
A tool for designing, creating, customizing and managing Axiell Collections applications and databases, broadly speaking, the Axiell Collections Model Application. As well as managing databases, including user access and permissions, Designer is used for such tasks as translating field labels, tooltips, values in drop lists, etc. (on the User interface texts tab). Here we see that Texthas been specified as the Screen text label for label.text (AB) in English:
If we filter the system field list in the Export box for
Text, we locate the field and can add it to the list of fields to be exported: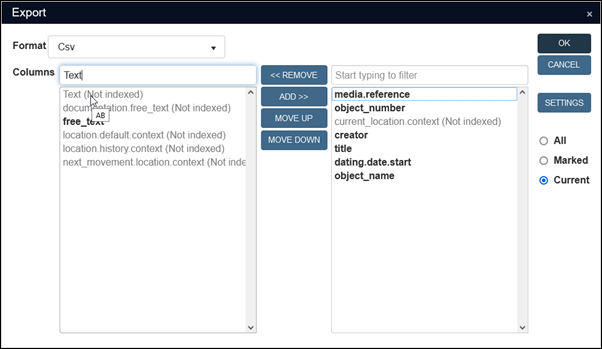
Very few fields have a Screen text label specified by default (although any field could have a Screen text label specified); it is however more common with fields that have an html data type, such as label.text (AB).
Identifying a field's Screen text label requires access to Axiell Designer; if you do not have access to Axiell Designer, you will need to ask your Application Administrator for assistance.
Tip: A Screen text label can be specified for any field in any data source
The management of a collection can involve a vast amount of information about objects / items / books, people and organizations, events, administration and more. This information is stored as records in data sources. Each data source stores a specific type of information: details about collection items, people, events, loans, and so on., so be sure to check a field's properties in the correct data source (more precisely, the correct .inf,collect.infin this example).By default, the Screen text label for label.text (AB) in common languages is:
See also:
- Reorder the list of fields if necessary by selecting a field in the right column and clicking Move up / Move down as required.
This will determine the order in which values display in the export data file.
Here we see fields removed from the original list, a field added and all reordered:
-
(Optional) Save your settings as an Export profile7.
Export profiles
The selections you make when configuring an Export job (the Format, selection of fields, etc.) can be saved as a profile and re-used as required.
To save settings as a profile:
-
Click Profiles to display the Profiles box:

- Click Create.
An entry is added to the Profiles box:

- Name the profile for this Export job by clicking New Profile and entering a meaningful name.
- To view the options set for an Export job, and the fields to be exported, click the arrow in the first cell.

- Click OK to close the Profiles box and load the profile
-OR-
Click Cancel to close the Profiles box without loading the profile.
-
- Select OK to run the export.
A box will display offering you the option to select an application to open the export data file or to save it.