See Properties of screen fields: Data tab in the Axiell Designer Help for details about configuring fields on screens (panels), including specifying data types, background colours, formatting and validation with regular expressions.
Details about configuring the properties of fields in data entry screens (data type, validation, mandatory) can be found in the Axiell Designer Help.
When a user selects a value in a Linked field![]() A type of field used to link one record to another. A Linked field is a drop list of values (records that the field can link to). When a link is made, the field stores a reference to the linked record (a linkref)., it is possible to populate additional fields in the primary record
A type of field used to link one record to another. A Linked field is a drop list of values (records that the field can link to). When a link is made, the field stores a reference to the linked record (a linkref)., it is possible to populate additional fields in the primary record![]() A link is made from one record (the primary) to another (the target). with data from the linked record. See Copy fields from linked record in the Axiell Designer Help for details.
A link is made from one record (the primary) to another (the target). with data from the linked record. See Copy fields from linked record in the Axiell Designer Help for details.
If a record lock is not removed from an edited record when it is saved or closed properly, it may be necessary to remove the lock with the Record lock manager tool. See The record lock manager in the Axiell Designer Help for details.
A record lock is applied to a record being edited and to a record it links to if there is a write-back relationship between the two (data entered in the current record is written back to the linked record). See Write fields to linked record for details.
In some implementations of Collections users are able to edit records directly in Result set View by clicking an Edit  button in the Result set View toolbar (disabled by default in the Standard Model).
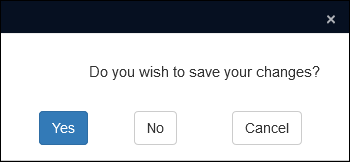
It is important to understand that when editing records in Result set View, Collections automatically saves an edited record without asking the user to confirm that changes should be saved whenever the user closes or leaves the edited record. In other words, the Save Prompt does not display (this is also true when clicking the Save record  button in Record details View).
If it is preferable that users always confirm their changes are saved, the Always prompt before saving option in settings.xml will restrict the ways an edited record can be saved to those that display the Save Prompt (it will not be possible to edit a record in Result set View):
<Setting Key="AlwaysPromptBeforeSave" Value="true" />
When disabled in Result set View, editing of records is always done in Record details View.
Details here.
A consequence of setting Always prompt before saving to true is that the Save  button does not display in the Record details View toolbar (the Result set View edit functionality and Record details View save functionality are linked). In this case, editing and saving of records in Record details View are both enabled by selecting the Edit
  button. The Save Prompt always display in Record details View when the Edit
  button is clicked or a user leaves an edited record (by clicking another record in Result set View for example):
The The EnableResultSetEdit setting1 can be used instead of AlwaysPromptBeforeSave to disable editing in Result set View without also disabling the Save record button in Record details View:
<Setting Key="EnableResultSetEdit" Value="false" />
Details here.
If your Collections system is multilingual, it is possible to add data to a record in every available language.
Before creating a new record, or editing an existing record, select the required language from the Data language drop list in the Main menu as the data will be saved in the selected language.
NOTE: you may find that the Edit multilingual texts option in Record details View is sufficient for your translation needs. This option allows you to edit data in every available language in a multilingual field![]() A field configured to hold data in more than one language. Not all fields in a multilingual system are necessarily configured to be multilingual fields. regardless of the Data language selected. Note that if a multilingual field is also a Linked field
A field configured to hold data in more than one language. Not all fields in a multilingual system are necessarily configured to be multilingual fields. regardless of the Data language selected. Note that if a multilingual field is also a Linked field![]() A type of field used to link one record to another. A Linked field is a drop list of values (records that the field can link to). When a link is made, the field stores a reference to the linked record (a linkref)., translation must occur in the linked record. Details here.
A type of field used to link one record to another. A Linked field is a drop list of values (records that the field can link to). When a link is made, the field stores a reference to the linked record (a linkref)., translation must occur in the linked record. Details here.
New records can be created in a number of ways in Axiell Collections:
- One or more records can be created with the Bulk create records tool in Result set View.
- A new record can be created by copying an existing record with the Copy record option in Record details View.
- A new record can be created from a record template in Record details View (some fields pre-populated with data).
- One or more records can be created (or updated) by importing data with the Import tool.
Here we describe how to create a single record from scratch in Record details View.
Tip: We step through the creation of different types of records in the Managing your collection section of this Help.
There are two ways to create a record from scratch:
| Select | Details |
|---|---|
|
New in the Main menu |
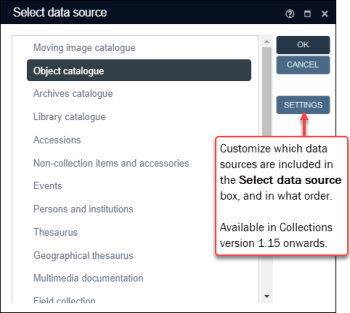
With this method you choose which data source
A new record opens in Record details View ready for editing. |
|
New record |
With this method a new record is added to the data source you are already working in:
A new record displays ready for editing (details below). |
Tip: A new record can also be created from a record template in Record details View with some fields pre-populated with data.
Default values
You may find that one or more fields in the new record already include a value: these are default values. Your Application Administrator can specify that a value displays in a field by default whenever a record is created. A default value is the most commonly used value in a field and is intended to save time and effort during data entry. It can be overwritten at any time.
If you have just created a record, it will be open in Record details View and ready for data entry.
If you want to edit the current record in Record details View:
- Select Edit
 in the Record details View toolbar.
The record will open in Edit mode
 A record is either in Display mode (we view its details) or Edit mode (we add or edit its details). A record enters Edit mode as soon as we create a new record, copy a record in Record details View or edit an existing record..
  Reasons why a record might be uneditable
There are generally two reasons why you might not be able to edit a record:
- You are not authorized to edit it.
The Axiell Collections permissions model is comprehensive and granular and access rights can be assigned to individual fields and records, as well as to functions such as record creation, editing and deletion. If you are able to edit other records, it is likely that you have been blocked from editing the current record; if you are unable to edit any records, it is likely that you do not have the Edit permission.
If you need to edit a record and are unable to, speak to your Application Administrator.
- The record is locked for editing by another user.
When a record is edited, a record lock is applied so that other users cannot simultaneously edit it. The lock is removed when the record is saved or closed by the record editor. There are circumstances in which the lock might not be removed. Details and solution here.
- You are not authorized to edit it.
Here we see a newly created record ready for data entry:
While editing a record in Record details View:
- Do not close your browser.
- If you have detached Record details View, do not close the detached Window.
- Do not close Record details View by clicking its button in the top Toolbar.
If you were adding details to a new record, you will lose the record.
If you were editing an existing record, you will lose your changes and the record will be locked for editing for other users.
Help View provides a description of a field's purpose and other data entry instructions as you edit a record.
To display Help View use the F1 keyboard shortcut or click the Help View button in the top Toolbar:

Full details about Help View can be found here.
You can always discard changes to a record before the record is saved by clicking the Edit  button in the Record details View toolbar. The Save Prompt will display with an option to discard your changes and exit Edit mode.
If you have already saved changes and wish to reverse them, you can use the Record history option.
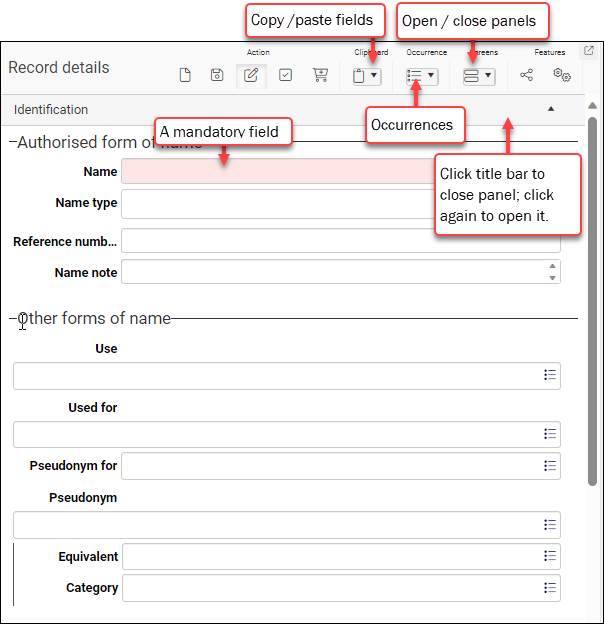
A record in Record details View is a collection of fields arranged in groups on panels. Panels can be opened and closed as you work with a record:
- When working with a record it can be handy to open all panels and scroll through all available data, but often you will only want to see fields relevant to your current task (updating location details for instance). It is possible to open / close individual panels or all panels simultaneously:
 Open / close panels
Each panel has a title bar containing a descriptive name, and when a panel is closed, only its title is visible:
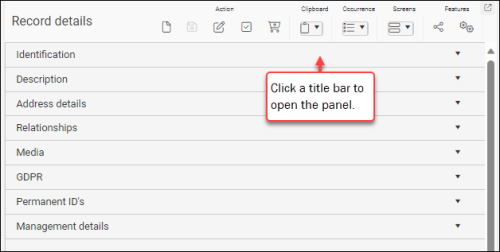
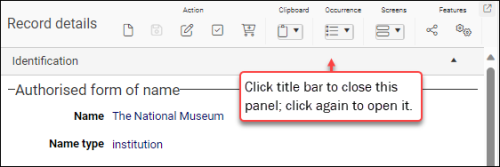
To open a panel individually, simply click the downward pointing triangle in the panel's title bar. The triangle reverses direction. Click again to close it:
To open / close all panels simultaneously, use the buttons in the Screens drop list3 on the Record details View toolbar:

 Details
Three options are available in the Screens drop list4 for opening / closing panels simultaneously:
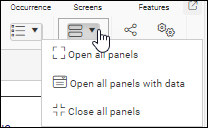
To open all panels :
- Click the toolbar button

-OR-
Use the keyboard shortcut, ALT+<down arrow>
To open panels only if there is data in their fields:
- Click the toolbar button

To close all panels:
- Click the toolbar button

-OR-
Use the keyboard shortcut, ALT+<up arrow>
 Collections versions older than version 1.18
To open all panels:
- Click the toolbar button

-OR-
Use the keyboard shortcut5, ALT+<down arrow>
To close all panels:
- Click the toolbar button

-OR-
Use the keyboard shortcut, ALT+<up arrow>
- Click the toolbar button
- Closing a panel while editing a record does not lose data, nor does it save the data (for that you must click the Save or Edit button in the toolbar).
Only one person can edit a record at a time: when you start to edit a record, a lock is applied and other users are unable to edit it until the lock is removed when you save the record or close it without saving changes. One or more additional records may be locked for editing if the current record![]() The record currently displayed in Record details View or highlighted (with a solid background) in Result set View or Gallery View for instance. is linked to a record and there is a write-back relationship between the two (data entered in the current record is written back to the linked record).
The record currently displayed in Record details View or highlighted (with a solid background) in Result set View or Gallery View for instance. is linked to a record and there is a write-back relationship between the two (data entered in the current record is written back to the linked record).
A locked record can still be viewed by other users, but it cannot be edited or deleted.
If a record being edited is closed improperly (due to a browser or system crash; or by closing the browser or Record details View while the record is being edited), the record will remain locked for other users.
The user who was last editing the record needs to return the record to Edit mode![]() A record is either in Display mode (we view its details) or Edit mode (we add or edit its details). A record enters Edit mode as soon as we create a new record, copy a record in Record details View or edit an existing record. by clicking the Edit
A record is either in Display mode (we view its details) or Edit mode (we add or edit its details). A record enters Edit mode as soon as we create a new record, copy a record in Record details View or edit an existing record. by clicking the Edit  button in the Record details View toolbar. A message will display:

Select Yes to return the record to Edit mode. Then Save or close the record to remove the lock.
If a record lock cannot be removed in this way, your Application Administrator or other authorized user will need to remove the lock with the Record lock manager tool.
Record locks applied within Adlib for Windows are respected by Axiell Collections and vice versa (a record locked in one environment is locked in the other), however a user must remove the lock in the environment in which it was applied.
If this is not possible, your Application Administrator or other authorized user will need to remove the lock with the Record lock manager tool.
Collections provides some assistance as you enter data in fields:
- Increasing the size of fields dynamically as you enter data so that all your data is readable as you enter it.
- Controlling the type of data that a field will accept and validating data to ensure that it complies with the requirements of the field.
The type of values that you can enter in a field is determined by a field's data type. A field with a Text data type will accept all characters, a Numeric field will accept numeric decimal numbers, an Integer will only accept whole numbers, a Date field expects dates, and so on. Beyond data type, some fields are configured to be unique (notably fields like object_number (IN)).
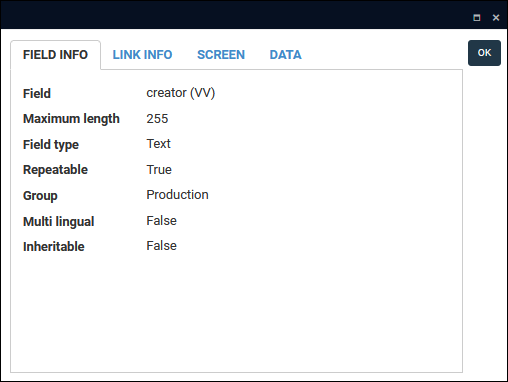
Details about a field's properties are available in the Field properties box, which is accessed in Display or Edit mode![]() A record is either in Display mode (we view its details) or Edit mode (we add or edit its details). A record enters Edit mode as soon as we create a new record, copy a record in Record details View or edit an existing record. by right-clicking a field and selecting Properties from the context menu:
A record is either in Display mode (we view its details) or Edit mode (we add or edit its details). A record enters Edit mode as soon as we create a new record, copy a record in Record details View or edit an existing record. by right-clicking a field and selecting Properties from the context menu:
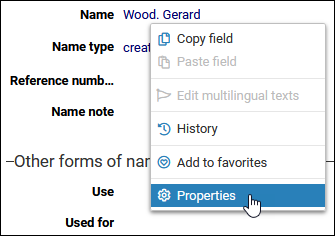
Note: Details about all options available from this context menu are available here.
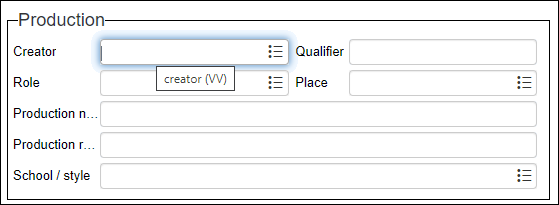
Information in the Field properties box includes a field's system name and tag (e.g. creator (VV)), and its field (data) type (e.g. Text):
Note: Full details about the Field properties box can be found here.
All data entered into fields is validated when you exit the field (by pressing TAB or clicking another field for instance). If the data entered in a field is not valid for the field (letters are entered in a Numeric field for instance, or a non-unique value is entered in a field configured to hold unique values only), a message will pop-up indicating how the value is invalid:
- Non-unique value:

You cannot save a record with a duplicate value in a unique field.
- Wrong data type:
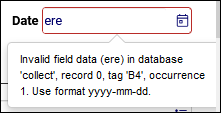
If you do not correct the error and save a record with the wrong type of data in a field, the record will be saved but the erroneous value will be cleared from the field.
It is still possible to enter inaccurate data in a field, of course; for instance, a date field expects numbers and entering meaningless numbers or the wrong date will be accepted. Validation does not guarantee that the data entered is accurate, but does guarantee that the data is appropriate for that field, i.e. a date has been entered in a date field.
When editing records in Record details View you will find that some fields have a background colour or they have no border. This tells you something about data entry for the field. For instance, a field with a red background is mandatory, and a field with no border cannot be edited in the current record![]() The record currently displayed in Record details View or highlighted (with a solid background) in Result set View or Gallery View for instance.:
The record currently displayed in Record details View or highlighted (with a solid background) in Result set View or Gallery View for instance.:
| Colour |
Field |
Details |
|---|---|---|
|
White |
Editable field |
Most fields have a white background. Data can be entered in the field:
If a field does not include an icon, simply key data into the field. If a field does include an icon, as in the example above, how you enter or manage data depends on the icon. Details below. |
|
Red |
A red background indicates that a field is mandatory and a value has not yet been entered:
It is not possible to save the record until valid data has been entered in the field: if a mandatory field is missed, a warning message will display indicating which field is mandatory and on what panel it can be found. Once a value has been entered in a mandatory field, the background changes to white. |
|
|
No background or border (grey background in older versions of Collections) |
Replicated field (in the current record) |
Usually a field only appears in one place in a record; however, the same information may be relevant in more than one place and for that reason a field can display more than once in the same record. Typically only one instance of the field is editable. For example, details about an object's current location may appear on both the Identification panel and the Location | Future movements panel in a record in the Object catalogue. Details about an object's current location are entered on the Location | Future movements panel in the current_location.name (2A) field:
The same field appears on the Identification panel but there it has no border and it is not editable:
In older versions of Collections6 the replicated field has a grey background:
When a value is entered in the editable version of the field, it will display in the replicated field:
|
|
No background or border |
In Edit mode
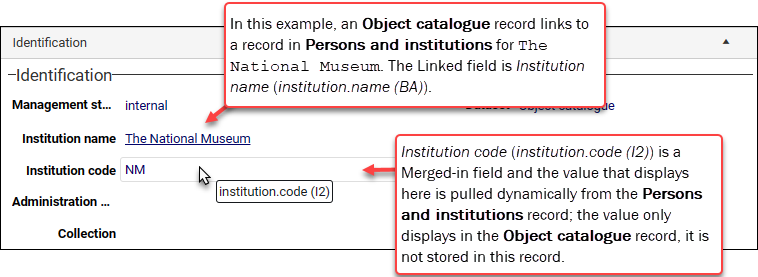
The value that displays in a Merged-in field is pulled dynamically from a linked record: when you link two records by selecting a value in a Linked field For example, a record in the Object catalogue is linked to the record for
More details See Types of field for full details about Merged-in fields. See How to link records for more details about these fields. See Searching remote indexes for details about searching Merged-in fields. |
We add or edit details in a record one field at a time. Depending on the type of field, data can be keyed into a field, a value can be selected from a list or pop-up, or you can search for a value to add to a Linked field![]() A type of field used to link one record to another. A Linked field is a drop list of values (records that the field can link to). When a link is made, the field stores a reference to the linked record (a linkref).:
A type of field used to link one record to another. A Linked field is a drop list of values (records that the field can link to). When a link is made, the field stores a reference to the linked record (a linkref).:
|
Field |
Icon |
Details |
||||||||||||||||||||||||||||||||||||||||||
|---|---|---|---|---|---|---|---|---|---|---|---|---|---|---|---|---|---|---|---|---|---|---|---|---|---|---|---|---|---|---|---|---|---|---|---|---|---|---|---|---|---|---|---|---|
|
|
A field with a white background and no icon has a data type of TEXT and will accept all characters. Simply enter your data (key it, paste it). |
|||||||||||||||||||||||||||||||||||||||||||
|
|
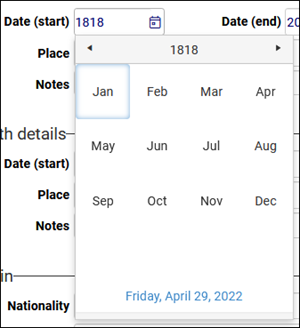
Click the Calendar icon to display a pop-up calendar and select a date to enter in the field. Selecting a date ensures that it is entered in the correct format. Alternatively, key a date into the field in the required format. Date fields have both a data type format (the format a date is entered into a field and stored in the database) and a presentation format (the format a field displays in a record in Display mode). These are usually the same, but can be different (dates might be stored in ISO date format but displayed using an appropriate regional format). Typically, all date fields across Collections will have the same data type and presentation format, and in the vast majority of cases this will be the ISO date format. Date fields can be configured to accept dates in five formats (and one deprecated format):
The simplest way to ensure a date is entered in the correct format is to use the calendar pop-up: Tip
Alternatively, key a date in the required format into the field. If the format is yyyy-mm-dd, you would enter something like: 2020-01-28 If the ISO date format has been specified (yyyy-mm-dd), you can enter partial dates, such as: 2020-12 or The simplest way to identify the required format is to select a date from the calendar pop-up: a date in the expected format will display:
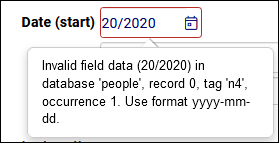
Entering invalid data in a date field will result in a pop-up that clearly identifies the required format:
Note: It is still possible to enter invalid data in a date field; a date field expects numbers and entering meaningless numbers may be accepted. An Advanced search for datesAlthough date fields in Collections can be configured to accept dates in a number of formats, they typically have a DateIso data format and are stored in your database with a format of yyyy-mm-dd. Fields with a DateIso data format can also have a presentation format, which determines how they display in the User Interface. A date stored in your database as As a rule, when your search value is a date, you can specify it using the DateIso data format, yyyy-mm-dd or the presentation format. The exception to this rule is a date with the Locale date (long) ISO date presentation format in which days and months are in words, e.g.: Thursday 8 October 2020 In this case your search value can be in the DateIso data format, yyyy-mm-dd or the Locale date (short) format. The format of Locale date (short) and Locale date (long) are determined by your local Windows date settings. See Advanced search for more details. |
|||||||||||||||||||||||||||||||||||||||||||
|
|
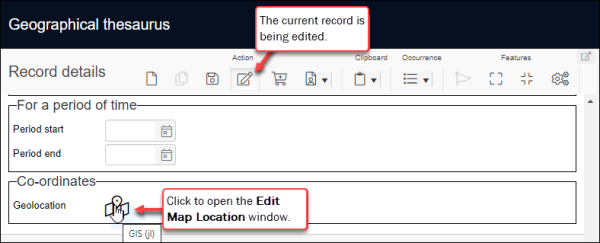
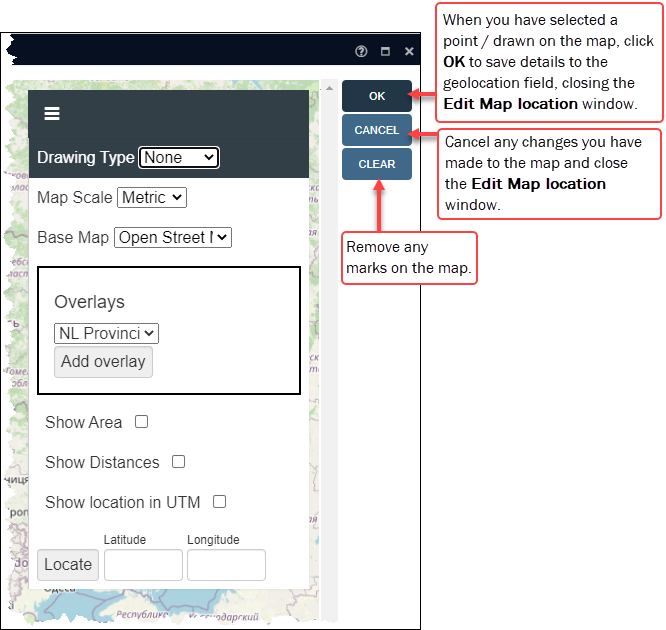
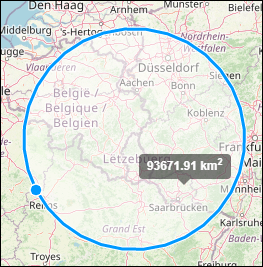
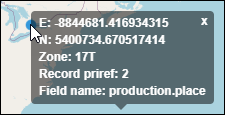
When GIS functionality is enabled in your system, locations are recorded in a Geographical thesaurus data source Click the icon to open an Edit Map location window and add a location: In the Geographical thesaurus:
|
|||||||||||||||||||||||||||||||||||||||||||
|
Increase / decrease number |
|
This icon appears in a field expecting a number. Key a number in the field and/or click an arrow head to increase or decrease the number in the field. |
||||||||||||||||||||||||||||||||||||||||||
|
Linked field |
|
A Linked field is used to link the current record to another record, and it operates as a drop list of values (records that the field can link to). When a link is made, the field stores a reference to the linked record (a To link to an existing record:
If the value you are looking for is not listed, click Full details about linking records in Collections, and how to work with Linked fields is available here. |
||||||||||||||||||||||||||||||||||||||||||
|
Read-only list |
|
Click the arrow to display a read-only list of values. Select a value to add it to the field. |
||||||||||||||||||||||||||||||||||||||||||
|
Time |
|
Click the Time icon to display a scrollable drop list of times in half hour intervals from Select a time (and edit if required) or key a time in the required format: HH:MM:SS. |
||||||||||||||||||||||||||||||||||||||||||
|
|
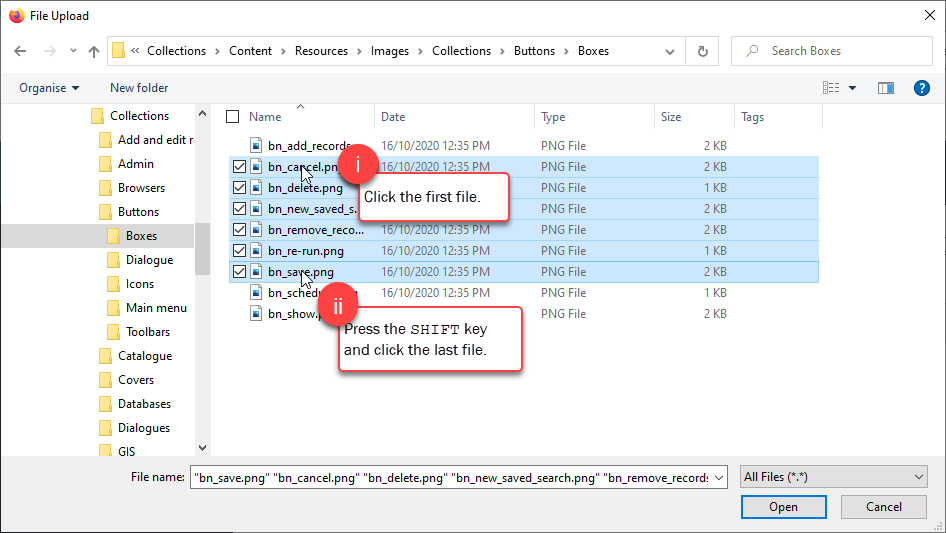
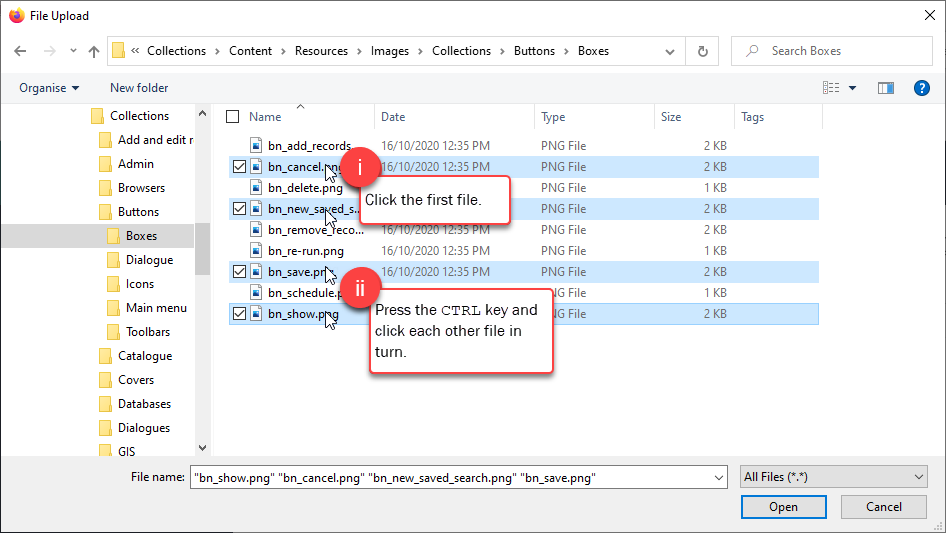
Locate a media file on your device or network, upload it to Collections and create a new record for it in the Multimedia documentation data source It is possible7 to upload and link multiple media files to an image or application field at once, whether you are editing a Multimedia documentation record or Catalogue record. The only condition is that the media field is repeatable (it is only possible to upload and link a single media file in non-repeatable media fields). To upload multiple media files simultaneously:
It matters which media field occurrence currently has focus (the cursor is in the field) when selecting the Upload button: the linking of uploaded files will start in the active field occurrence:
When the record is saved, the icon changes to See Working with media for details. |
If a value has been saved to a field's list of favourites, it can be copied to that same field when editing a record8:
In Record details View, in Display or Edit mode![]() A record is either in Display mode (we view its details) or Edit mode (we add or edit its details). A record enters Edit mode as soon as we create a new record, copy a record in Record details View or edit an existing record., a value can be added to a list of favourites for the current field by right-clicking a field with a value and selecting Add to favourites in the context menu that displays (details here). This can be useful if the same value (term, name, date, etc.) is often entered into a field as it can be selected from the list of favourites rather than being keyed into the field or, in the case of Linked fields
A record is either in Display mode (we view its details) or Edit mode (we add or edit its details). A record enters Edit mode as soon as we create a new record, copy a record in Record details View or edit an existing record., a value can be added to a list of favourites for the current field by right-clicking a field with a value and selecting Add to favourites in the context menu that displays (details here). This can be useful if the same value (term, name, date, etc.) is often entered into a field as it can be selected from the list of favourites rather than being keyed into the field or, in the case of Linked fields![]() A type of field used to link one record to another. A Linked field is a drop list of values (records that the field can link to). When a link is made, the field stores a reference to the linked record (a linkref)., selected from the drop list or Find data for the field box.
A type of field used to link one record to another. A Linked field is a drop list of values (records that the field can link to). When a link is made, the field stores a reference to the linked record (a linkref)., selected from the drop list or Find data for the field box.
Once a value has been saved to a field's list of favourites, it can be copied to that same field when editing a record:
-
Right-click the field and hover the cursor over the Favourites option in the context menu to display the list of favourites.
-
Select the required value from the sub menu:
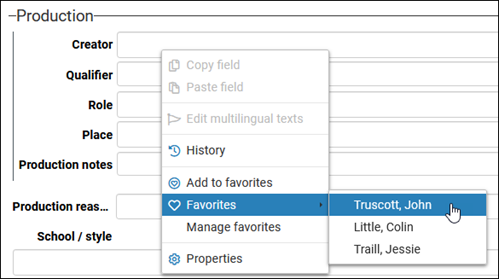
The value is copied to the field and will overwrite any value already entered in the field.
Note: The Favourites and Manage favourites option are only present in the context menu if at least one favourite has been stored for the field.
With the Manage favourites option it is possible to change the order of values in the list of favourites for the current field, delete a value from the list, remove all values from the list, and view the complete text of a value (details here).
If one or more values are shared between records, you can copy values to the Collections Clipboard and paste values into fields:
The Clipboard can be a useful editing tool if one or more values are shared between records in the same data source![]() The management of a collection can involve a vast amount of information about objects / items / books, people and organizations, events, administration and more. This information is stored as records in data sources. Each data source stores a specific type of information: details about collection items, people, events, loans, and so on..
The management of a collection can involve a vast amount of information about objects / items / books, people and organizations, events, administration and more. This information is stored as records in data sources. Each data source stores a specific type of information: details about collection items, people, events, loans, and so on..
The Collections clipboard, which operates independently from the Windows clipboard, can store the contents of different fields simultaneously: when you use the Copy field option, a field's content is saved to the Collections clipboard and associated with the field's unique tag![]() A field tag is a unique two character identifier for a field.:
A field tag is a unique two character identifier for a field.:
- When the cursor is in the same field in another record (a field with the same tag), you can use Paste field (CTRL+K) to paste the Collections clipboard content associated with that field.
-OR-
- When you are editing a record, you can use Paste all fields (CTRL+J) to paste the clipboard content associated with every field currently stored in the Collections clipboard.
It is possible to store multiple values for the same field (multiple creators or authors for instance). In this case, each value is stored as an occurrence![]() If a field in the current record can have more than one value, we add an occurrence of the field for each value (e.g. a book can have multiple authors so we add an occurrence of the author.name (au) field for each author). An occurrence can be a member of a group of fields, and adding an occurrence of the field adds all members of the group at once.. If a field can have more than one occurrence, pasting the contents of that field will add an occurrence for each stored value. We demonstrate this below.
If a field in the current record can have more than one value, we add an occurrence of the field for each value (e.g. a book can have multiple authors so we add an occurrence of the author.name (au) field for each author). An occurrence can be a member of a group of fields, and adding an occurrence of the field adds all members of the group at once.. If a field can have more than one occurrence, pasting the contents of that field will add an occurrence for each stored value. We demonstrate this below.
Note
- Each data source
 The management of a collection can involve a vast amount of information about objects / items / books, people and organizations, events, administration and more. This information is stored as records in data sources. Each data source stores a specific type of information: details about collection items, people, events, loans, and so on. has its own Collections clipboard and it is not possible to paste values from one data source into a record in another data source.
 - The Collections clipboard is emptied when your current session expires (typically when you log out of Collections).
Four options are available from the Clipboard drop list:
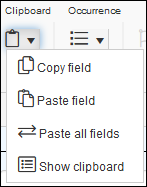
With the cursor in a field in Edit mode![]() A record is either in Display mode (we view its details) or Edit mode (we add or edit its details). A record enters Edit mode as soon as we create a new record, copy a record in Record details View or edit an existing record., copy the contents of the field to the Collections clipboard.
A record is either in Display mode (we view its details) or Edit mode (we add or edit its details). A record enters Edit mode as soon as we create a new record, copy a record in Record details View or edit an existing record., copy the contents of the field to the Collections clipboard.
Note: In Display mode, right-click a field and select Copy field from the context menu.
The contents of a field can be copied to the Collections clipboard in both Edit and Display mode:
- In Edit mode, place the cursor in a field:
- Use the keyboard shortcut, CTRL+D
-OR-
Select Copy field from the Clipboard
 drop list in the Record details View toolbar
-OR-
Right-click the field and select Copy field from the context menu:
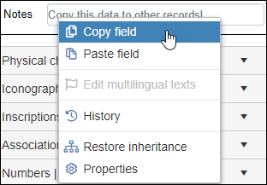
- Use the keyboard shortcut, CTRL+D
- In Display mode:
- Right-click the field and select Copy field from the context menu.
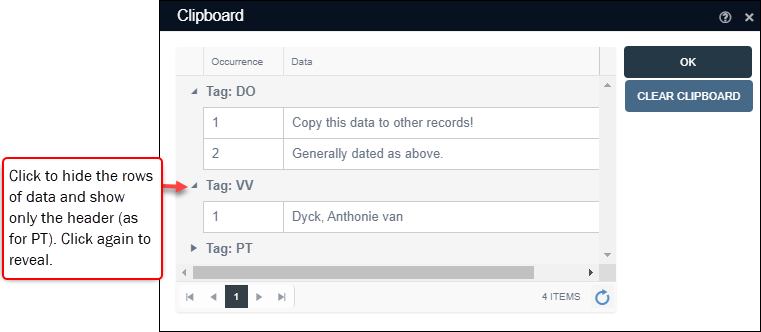
When we view the Collections clipboard (select Show clipboard from the Clipboard drop list), we see that the field content has been stored and associated with the field tag:
If we copy data from the same field, a second occurrence![]() If a field in the current record can have more than one value, we add an occurrence of the field for each value (e.g. a book can have multiple authors so we add an occurrence of the author.name (au) field for each author). An occurrence can be a member of a group of fields, and adding an occurrence of the field adds all members of the group at once. will be added for the field; if we copy data from another field, a new entry (tag plus data) will be added to the Collections clipboard:
If a field in the current record can have more than one value, we add an occurrence of the field for each value (e.g. a book can have multiple authors so we add an occurrence of the author.name (au) field for each author). An occurrence can be a member of a group of fields, and adding an occurrence of the field adds all members of the group at once. will be added for the field; if we copy data from another field, a new entry (tag plus data) will be added to the Collections clipboard:
The order of tags is the order in which they are added to the Collections clipboard.
With the cursor in a field in Edit mode, paste value(s) copied to the Collections clipboard for this field.
As we see above, the Collections clipboard can store values for multiple fields. The Paste field option only pastes content stored in the Collections clipboard for the currently active field (the cursor is in the field):
- If there is only one value stored in the clipboard for a particular field, that value is pasted into the field.
- If there is more than one value stored in the clipboard for a particular field BUT that field can only hold one value in a record (only one occurrence
 If a field in the current record can have more than one value, we add an occurrence of the field for each value (e.g. a book can have multiple authors so we add an occurrence of the author.name (au) field for each author). An occurrence can be a member of a group of fields, and adding an occurrence of the field adds all members of the group at once.), the first value in the clipboard for that field will be pasted into the field:
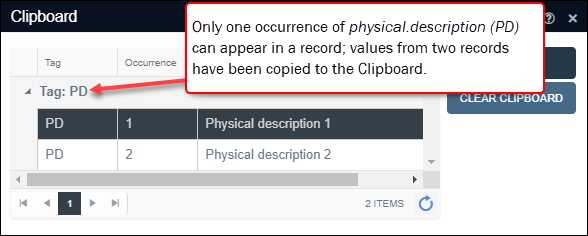
Because only one instance of the physical.description (PD) field can appear in a record, when we select Paste field, only the first value listed in the Collections clipboard is pasted into a field:

- If the active field can have multiple occurrences and the Collections clipboard stores more than one occurrence for that field, each value will be pasted as a separate occurrence.
In this example the Collections clipboard stores two values for the creator (VV) field:
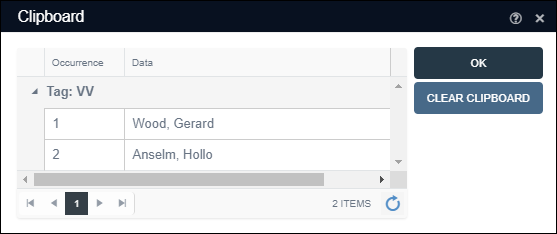
Here we see the cursor in the creator (VV) field in a record in Edit mode:
When we use the Paste field option, an occurrence of the creator (VV) field is added for each value stored in the Collections clipboard:
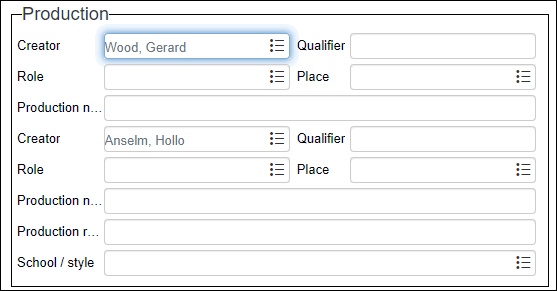
In Edit mode, paste all values stored in the Collections clipboard into the current record.
All values stored in the Collections clipboard will be pasted into the current record in the appropriate fields. The cursor can be in any field when Paste all fields (CTRL+J) is used.
The same rules regarding occurrences apply as for Paste field.
Select Show clipboard to open the Clipboard box and view the contents of the Collections clipboard for the current data source![]() The management of a collection can involve a vast amount of information about objects / items / books, people and organizations, events, administration and more. This information is stored as records in data sources. Each data source stores a specific type of information: details about collection items, people, events, loans, and so on.:
The management of a collection can involve a vast amount of information about objects / items / books, people and organizations, events, administration and more. This information is stored as records in data sources. Each data source stores a specific type of information: details about collection items, people, events, loans, and so on.:
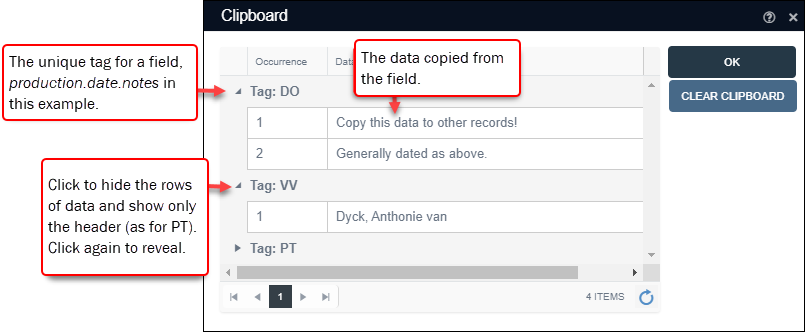
Other than viewing the contents of the Collections clipboard, the only other function the Clipboard box provides is emptying the clipboard of all stored values with the Clear Clipboard button.
And if you have more data to add to a record than there are fields to add it to (more than one author for a book, or creator of an object), you will want to add a new occurrence![]() If a field in the current record can have more than one value, we add an occurrence of the field for each value (e.g. a book can have multiple authors so we add an occurrence of the author.name (au) field for each author). An occurrence can be a member of a group of fields, and adding an occurrence of the field adds all members of the group at once. of one or more fields:
If a field in the current record can have more than one value, we add an occurrence of the field for each value (e.g. a book can have multiple authors so we add an occurrence of the author.name (au) field for each author). An occurrence can be a member of a group of fields, and adding an occurrence of the field adds all members of the group at once. of one or more fields:
If a field can have more than one value, we add an occurrence of the field for each value (e.g. a book can have multiple authors so we add an occurrence of the author.name (ya) field for each author). An occurrence can be a member of a group of fields, and adding an occurrence of the field adds all members of the group at once.
When recording details about items in your collection, there will be situations where one field or group of fields is inadequate for capturing all available details. For instance, a book can have more than one author, an object can have more than one creator, but you will find that a new record in Books has only one Author field by default:
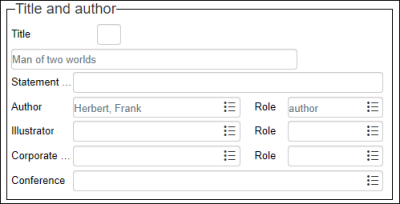
To accommodate the need for additional instances of a field, some are configured to be repeatable:
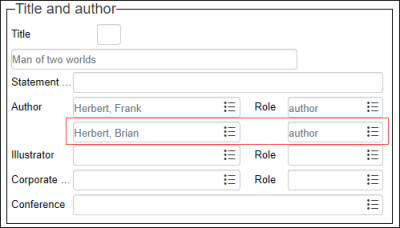
Full details about field occurrences can be found here.
Note: The options described below are only enabled if the cursor is in a field that can have more than one occurrence (it has been configured by your Application Administrator to be repeatable).
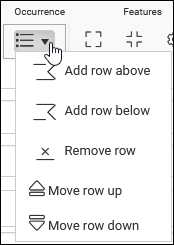
The Occurrences drop list in the Record details View toolbar has five options, which are enabled when a record is being edited:
|
Option |
Shortcut |
Details |
|---|---|---|
|
Add row above |
|
Add an occurrence of the field (or group of fields if the active field is a member of a group) above the active field. |
|
Add row below |
CTRL+ENTER |
Add an occurrence of the field (or group of fields if the active field is a member of a group) below the active field. |
|
Remove row |
|
Delete the occurrence of the field (or group of fields if the active field is a member of a group) from the record. Note: Data in the field(s) will be deleted. |
|
Move field down / up |
|
Select Move field down / up to reorder occurrences: if the active field is a member of a group of fields, all fields in the group will be moved together. Note: If automatic sorting of occurrences has been specified by your Application Administrator, any changes you make to the order will be overridden: occurrences will be sorted automatically (ascending or descending) when the record is saved. |
Tip: Limited record editing is also available in Result set View.
When you have created a new record or edited an existing record, save it:
When you save a record it is first validated to ensure that any mandatory fields have been completed. If a mandatory field has been missed, you will be required to go back and complete it: a warning message will display indicating which field is mandatory and on what panel it can be found.
If the record passes validation, it is saved, and the record returns to Display mode![]() A record is either in Display mode (we view its details) or Edit mode (we add or edit its details). A record enters Edit mode as soon as we create a new record, copy a record in Record details View or edit an existing record..
A record is either in Display mode (we view its details) or Edit mode (we add or edit its details). A record enters Edit mode as soon as we create a new record, copy a record in Record details View or edit an existing record..
In Record details View a record can be saved in a number of ways.
Note: In some systems, the Save button has been disabled and we use the Edit button to edit and save a record. Read the Information for Application Administrators above for details about Editing records in Result set View and saving records in Record details View.
| Method |
Button |
Details |
|---|---|---|
|
Save button |
|
The Save button in the Record details View toolbar is enabled as soon as a record is edited:
Select Save again to save the record and exit Edit mode. |
| Edit button |
|
The Edit button in the Record details View toolbar opens the current record in Edit mode and, when clicked again, saves the record and exits Edit mode. The Save Prompt will display with the following options:
Select:
|
| Leaving the current record |
|
If you have made changes to a record and leave it, the Save Prompt will display (details above). Leaving the current record occurs if you:
Warning: If you close Record details View by clicking its button |
 in the Record details View toolbar








 in
in 
